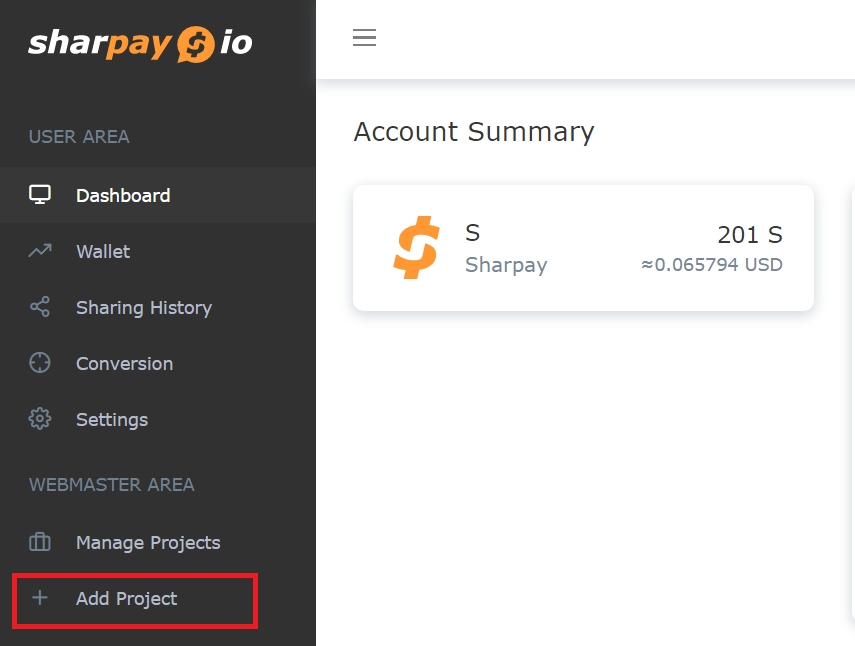
Add Project
- Create / log into my Sharpay account on app.sharpay.io.
-
Click «Add Project» on the left
sidebar menu.
-
Enter «Title» and «Domain names» and click «Get the code».
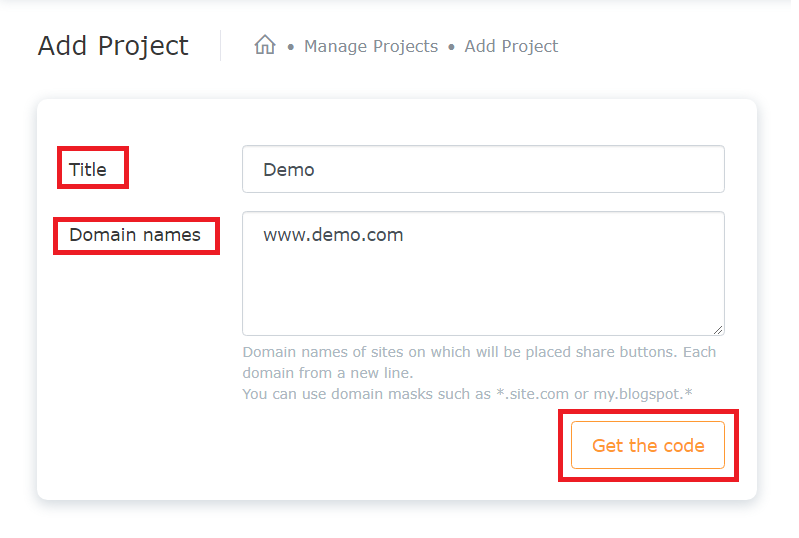
- After that, I will be directed to «Project Settings», I can get the installation
code, customize my share buttons and edit different settings.
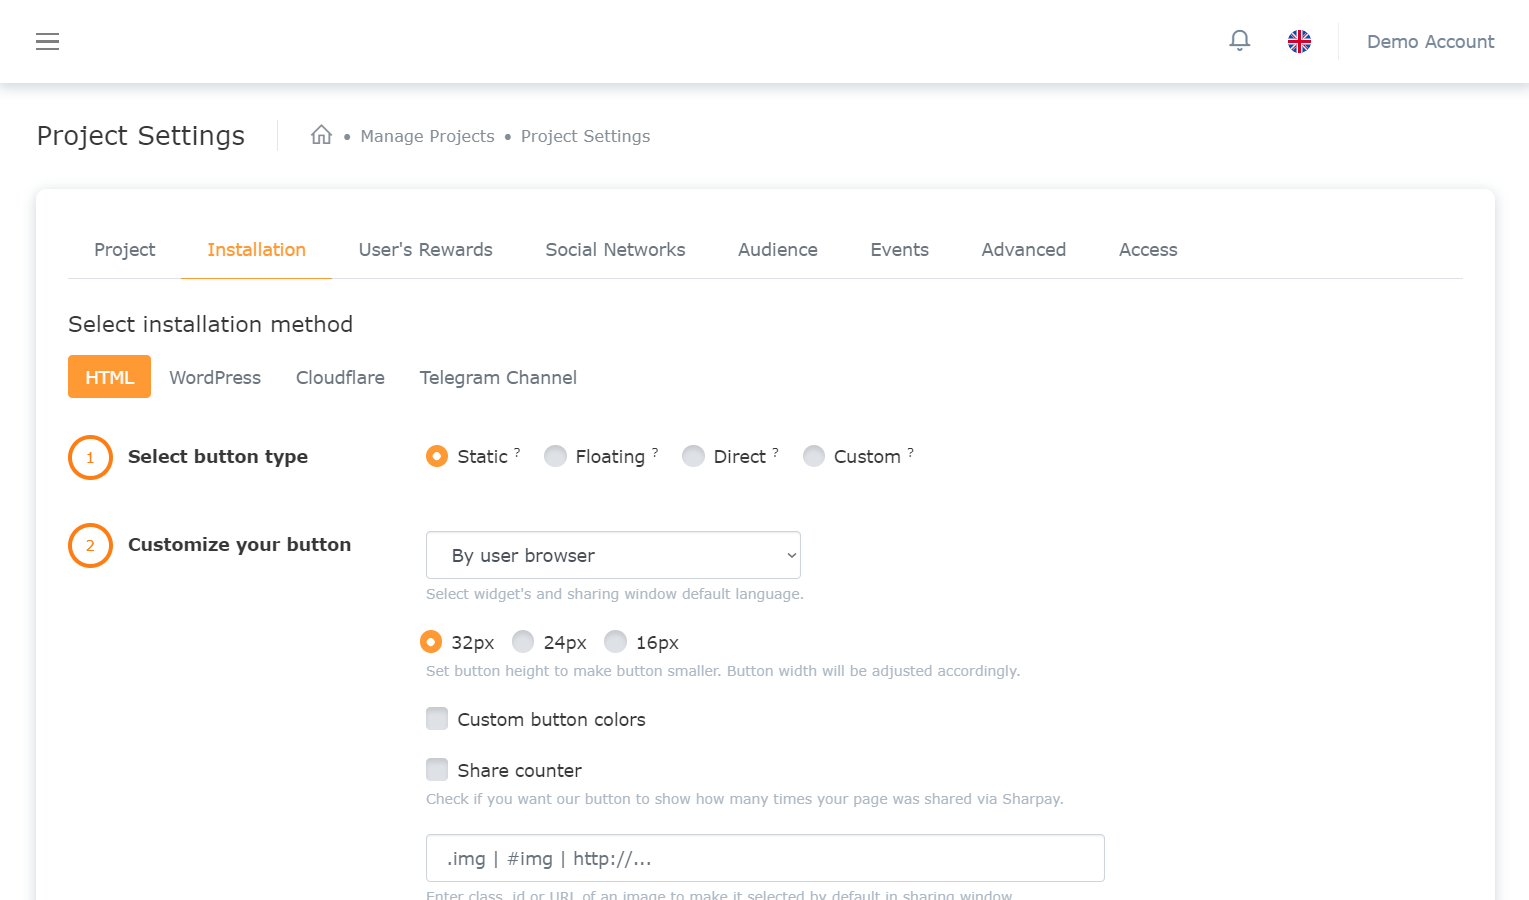
HTML Code
I need only 3 steps to install Sharpay buttons on my website:
- Selection button type
- Customize my button
- Copy & paste the code onto my website
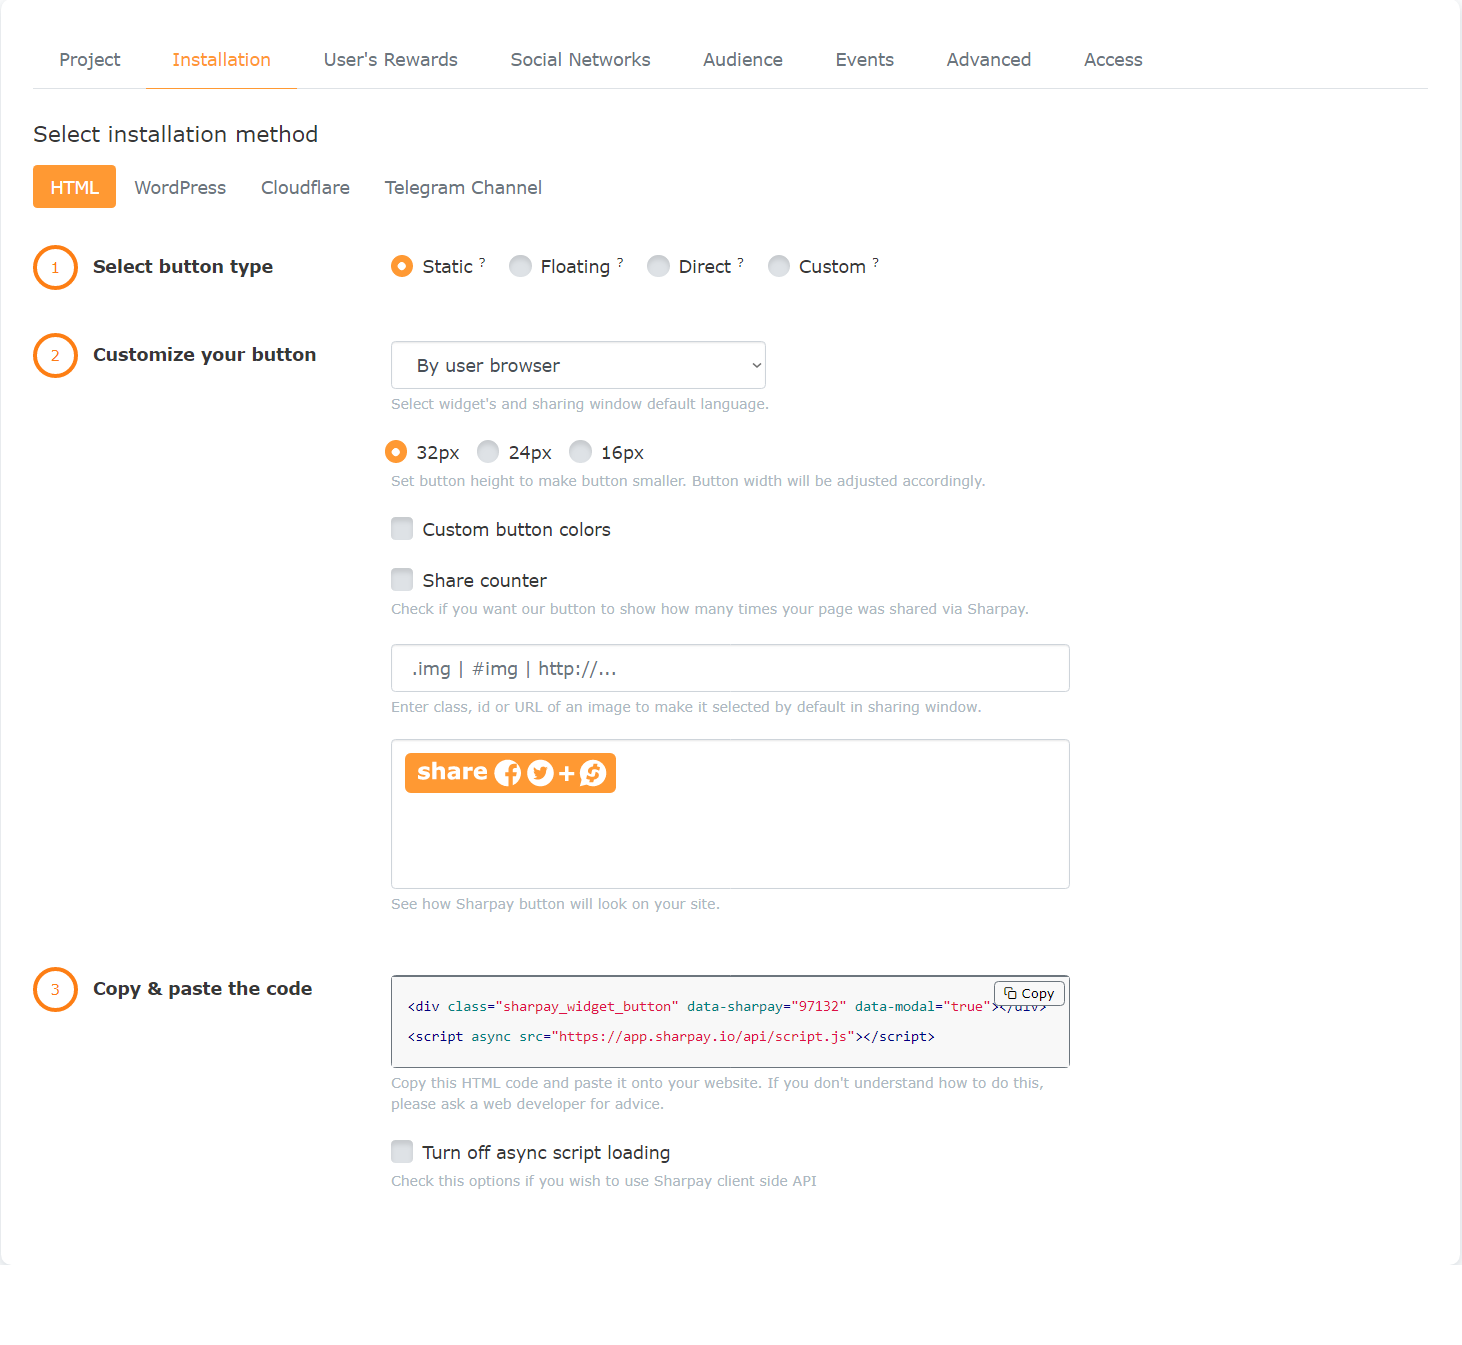
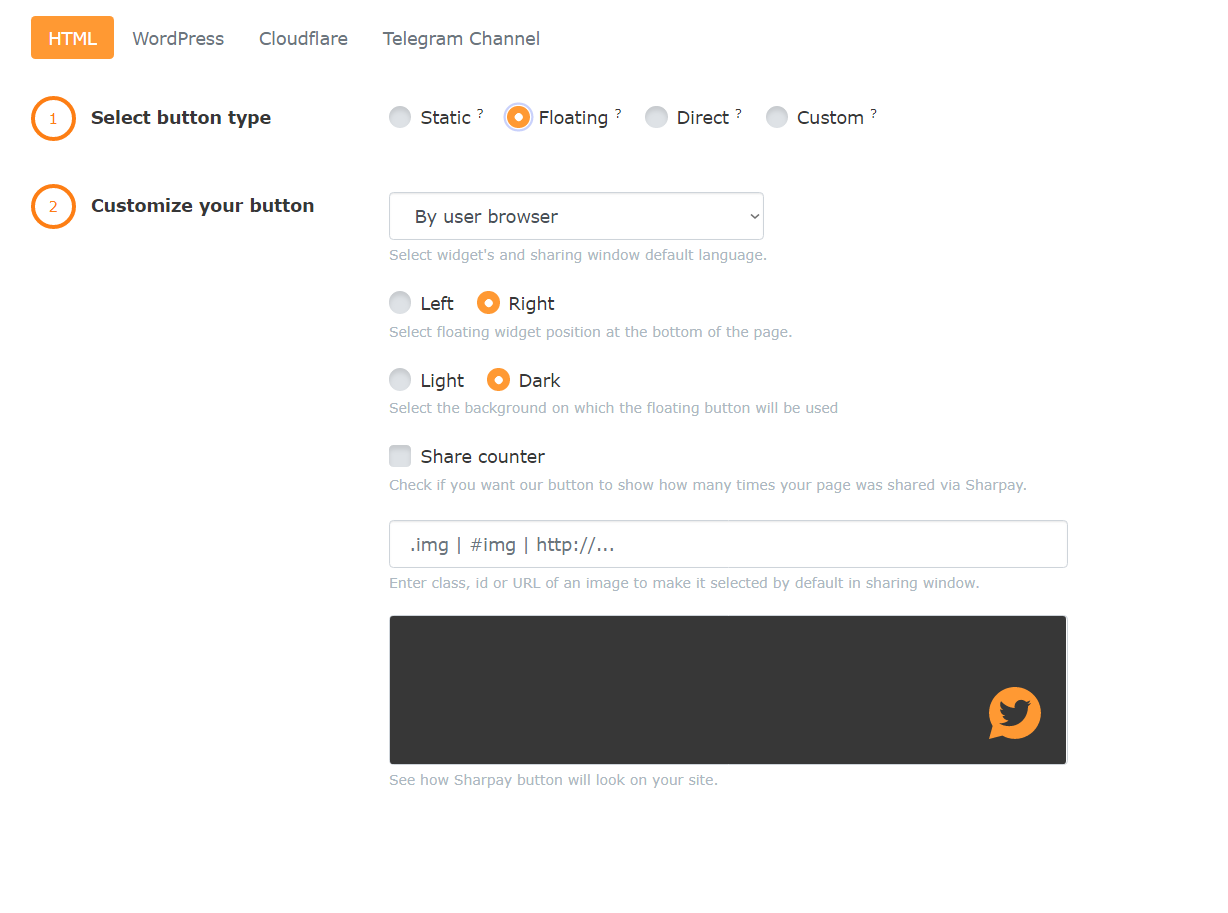
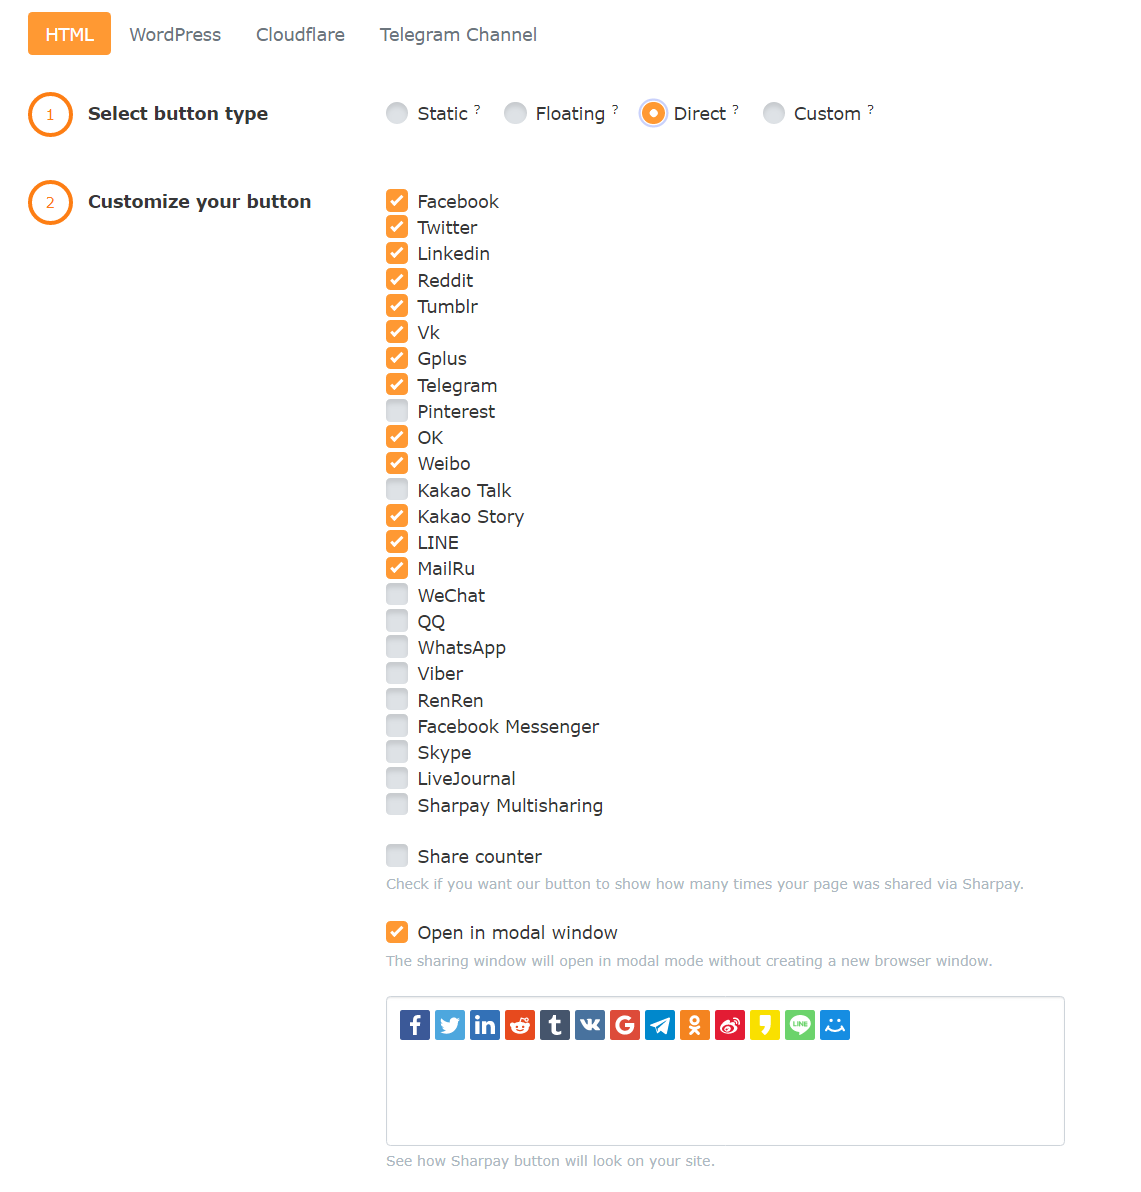
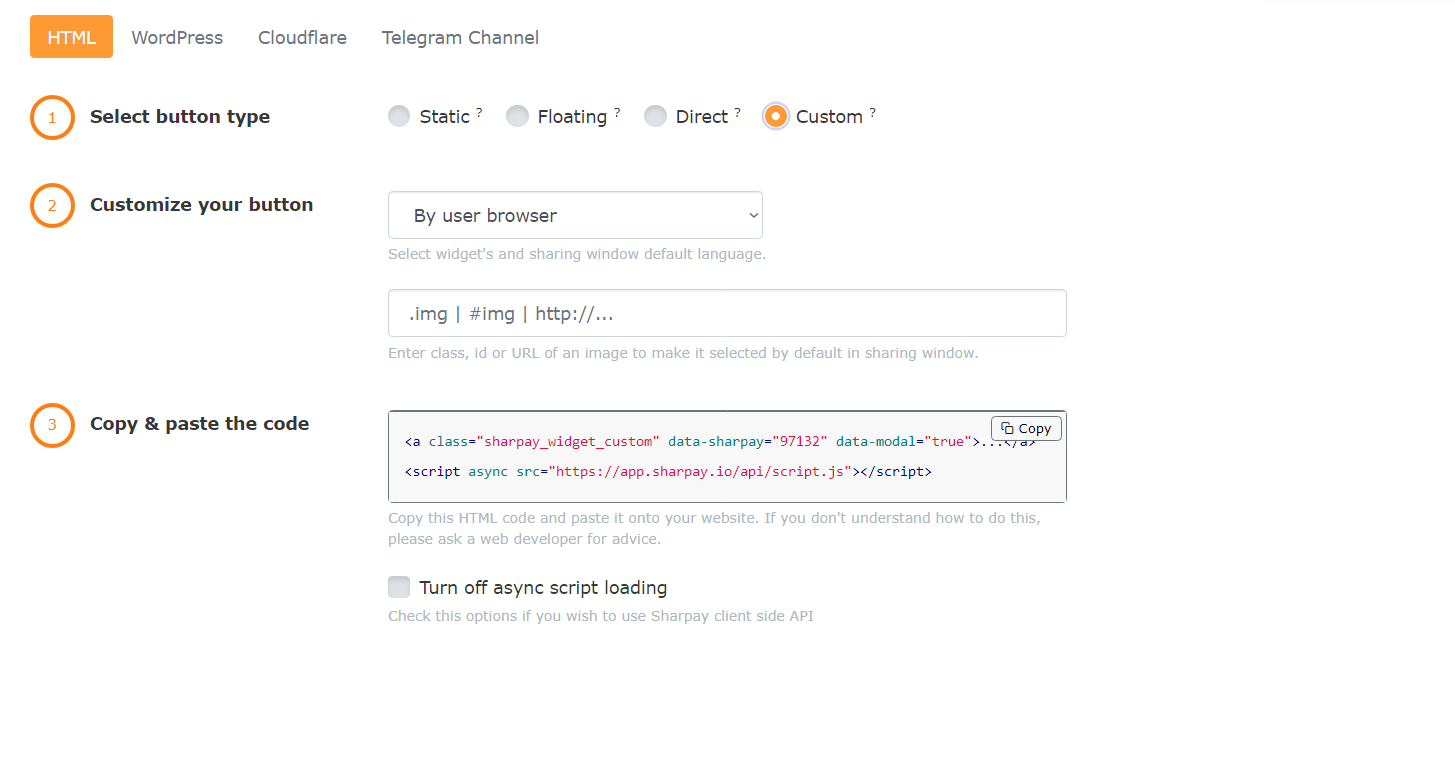
- Select button type. For the HTML method, there are four different button types:
- Static. I can put a static Sharpay button in any place I want on
my websites. I can adjust the button size and color.

- Floating. The Sharpay button will be automatically placed in a fixed
position at the bottom on my websites.
This is the default setting of a floating button, and of course, I may
style my button by changing and adding different
CSS values to fit my web design, for example, top, right, left, bottom,
margin values.
- Direct. In this button type, I may choose what social network
sharing buttons I want to put on my websites.
I can restrict users sharing and promoting my websites only on certain
social networks for my segmentation marketing.
- Custom. I can fully customize and design my own Sharpay button.
All I need is to include the code and javascript Sharpay.io provides me in my
design.
- Static. I can put a static Sharpay button in any place I want on
my websites. I can adjust the button size and color.
- Customize my button.There are different settings for different button
types.
🔸 For Static, Floating and Custom button type: I can change the default language in the sharing window. There are four different languages available (English, Chinese, Korean and Russian), or I can choose «By user browser» and let user’s browser decides which one to use.
🔸 If I want to show the share count, I can check the «Share counter» box in different button types. In the «.img |#img| http://» option, I can add my own image to show when users share my websites.
- Copy & paste the code. After all the settings, I need to copy and paste the
customized code on my websites.
If I do not know how to do that, I need to ask my web developers to help me.
🔸 There is a «Turn off async script loading» checkbox at the bottom. We recommend I to check this box if I want to use Sharpay client-side API for customized conversion events.
🔸 No matter what type of button I am going to use, I can always edit the CSS values and style my Sharpay button. I may see how my Sharpay button looks in the preview window.
WordPress Plugin
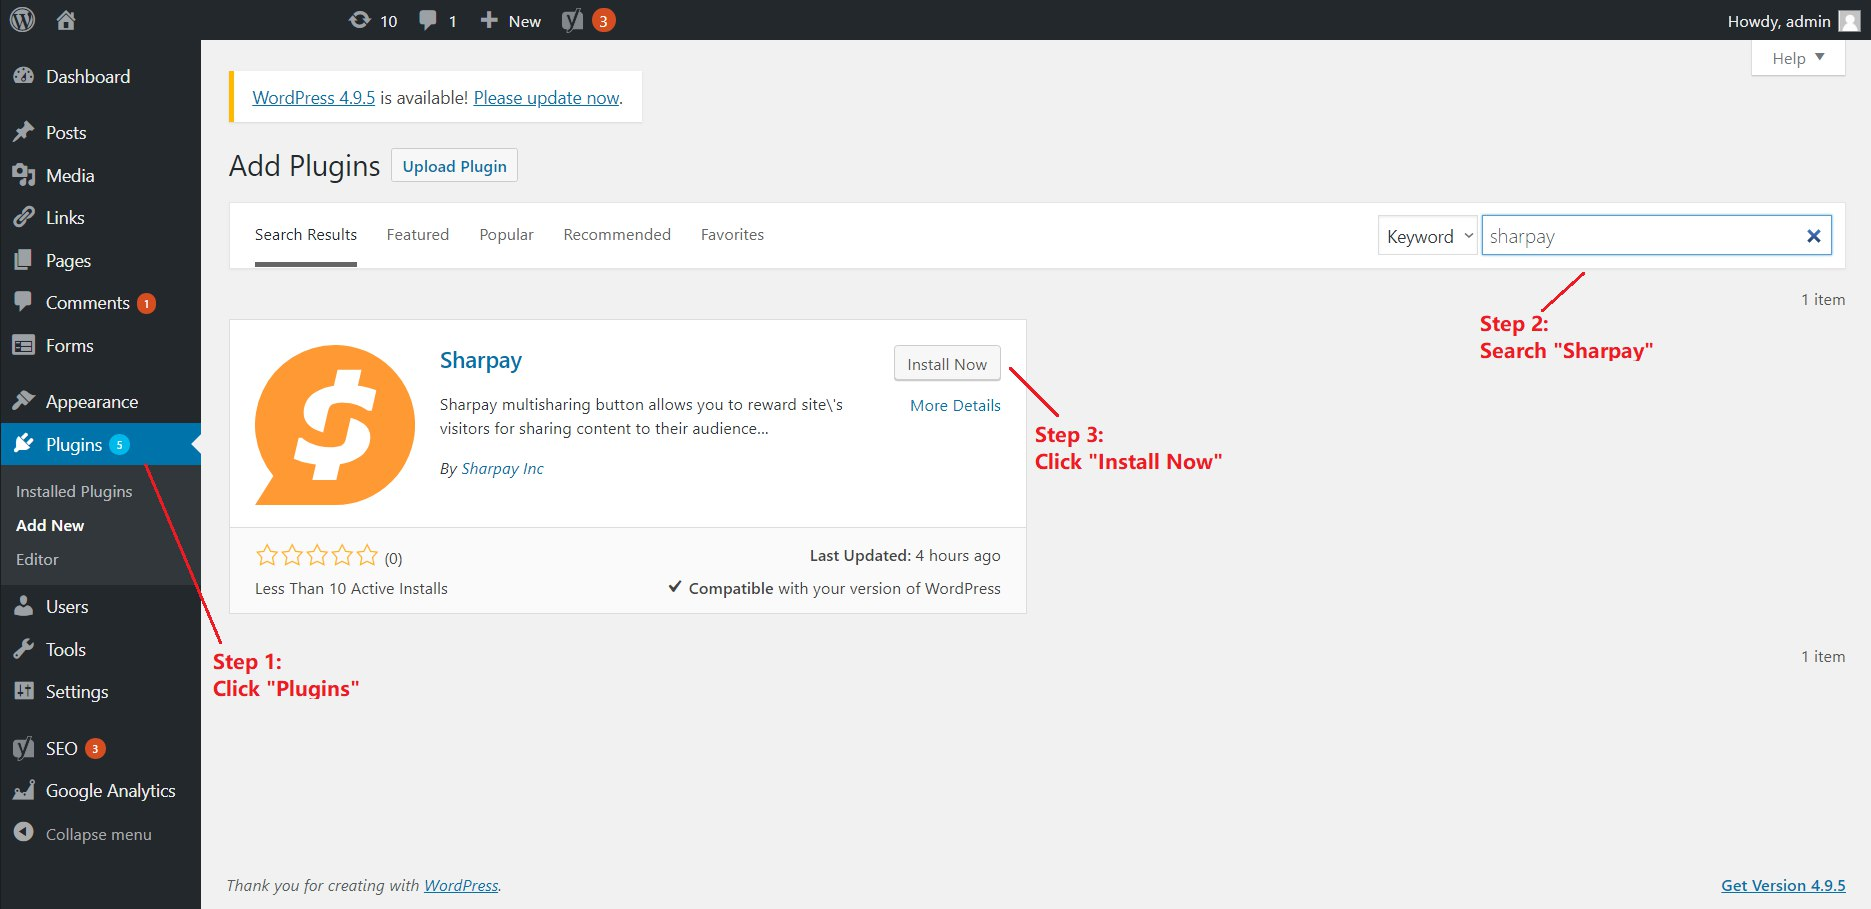
- Get plugin: Download Sharpay Plugin or find it in WordPress Admin Panel (Go to Plugins → Add Plugins and type sharpay in the search bar).
- Install: Upload the plugin files to the /wp-content/plugins/sharpay directory, or install the plugin through the WordPress plugins screen directly.
- Activate: Activate the plugin through the "Plugins" screen in WordPress.
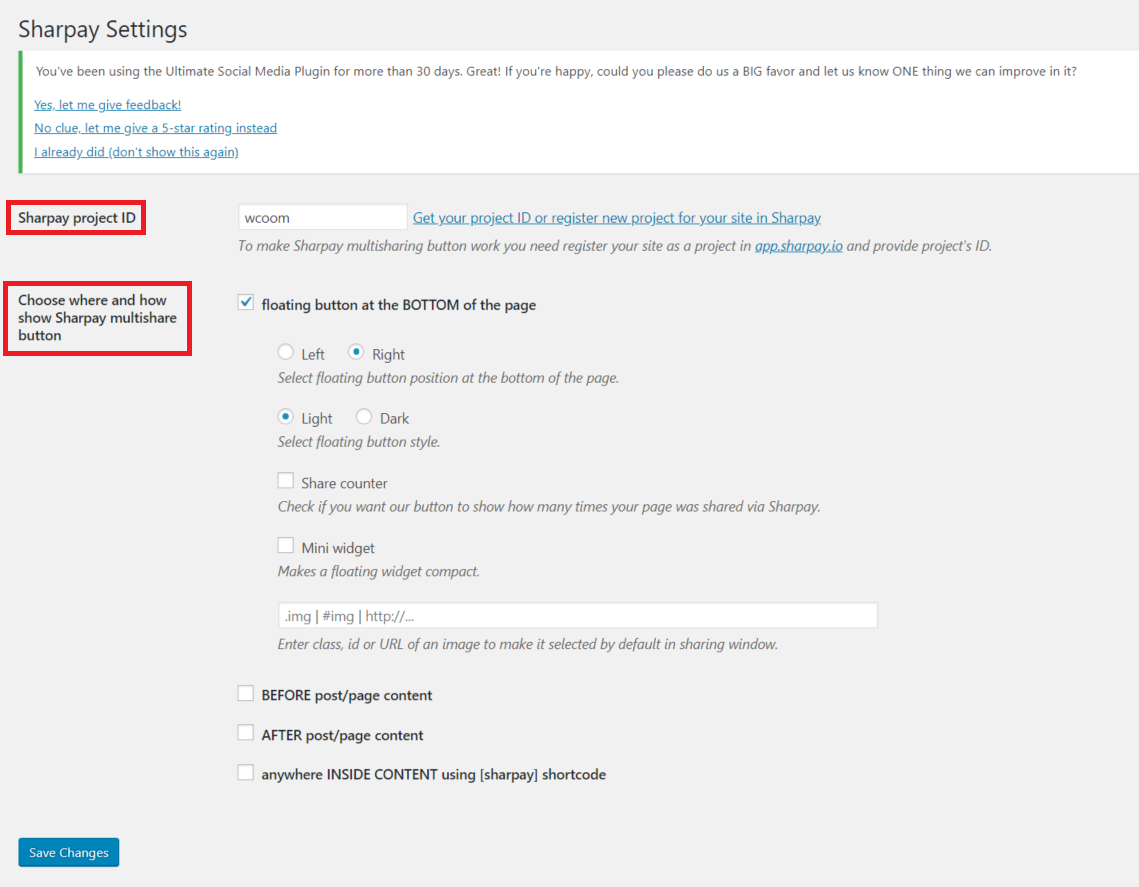
- Configure: Use the Settings → Sharpay screen to configure the plugin.
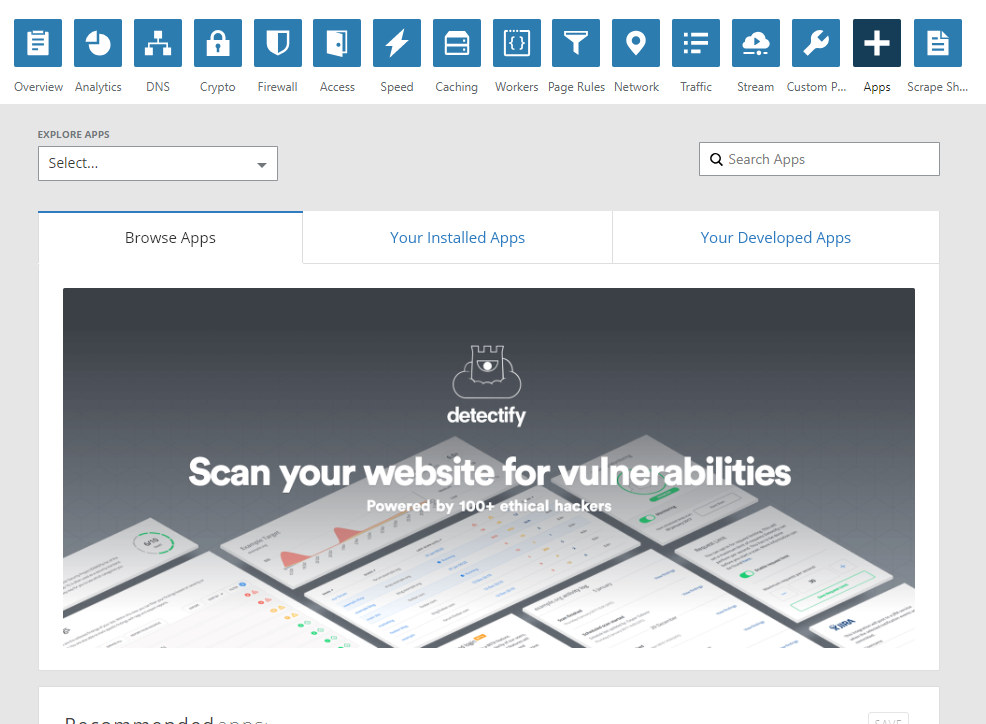
Cloudfalre App
-
Overview app: Go to the Sharpay App page
(https://www.cloudflare.com/apps/sharpay) in
Cloudflare Apps.
-
Preview: Click on the "Preview" button.
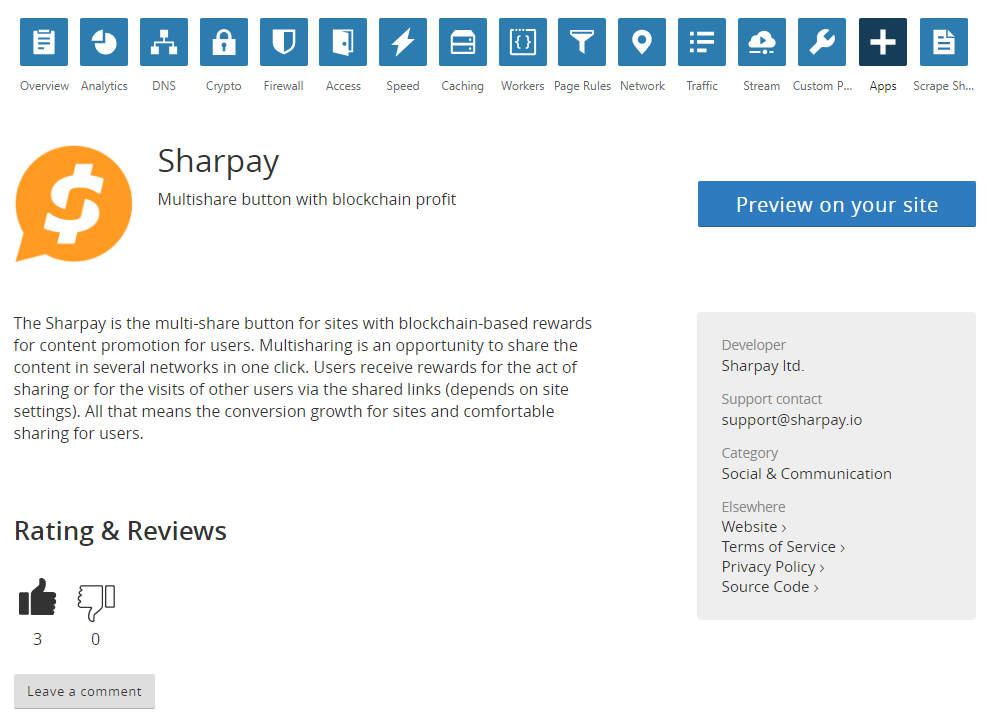
- Account: Connect my Sharpay Account to select a project or enter the "Site ID" of my project.
-
View: Customize the button view.
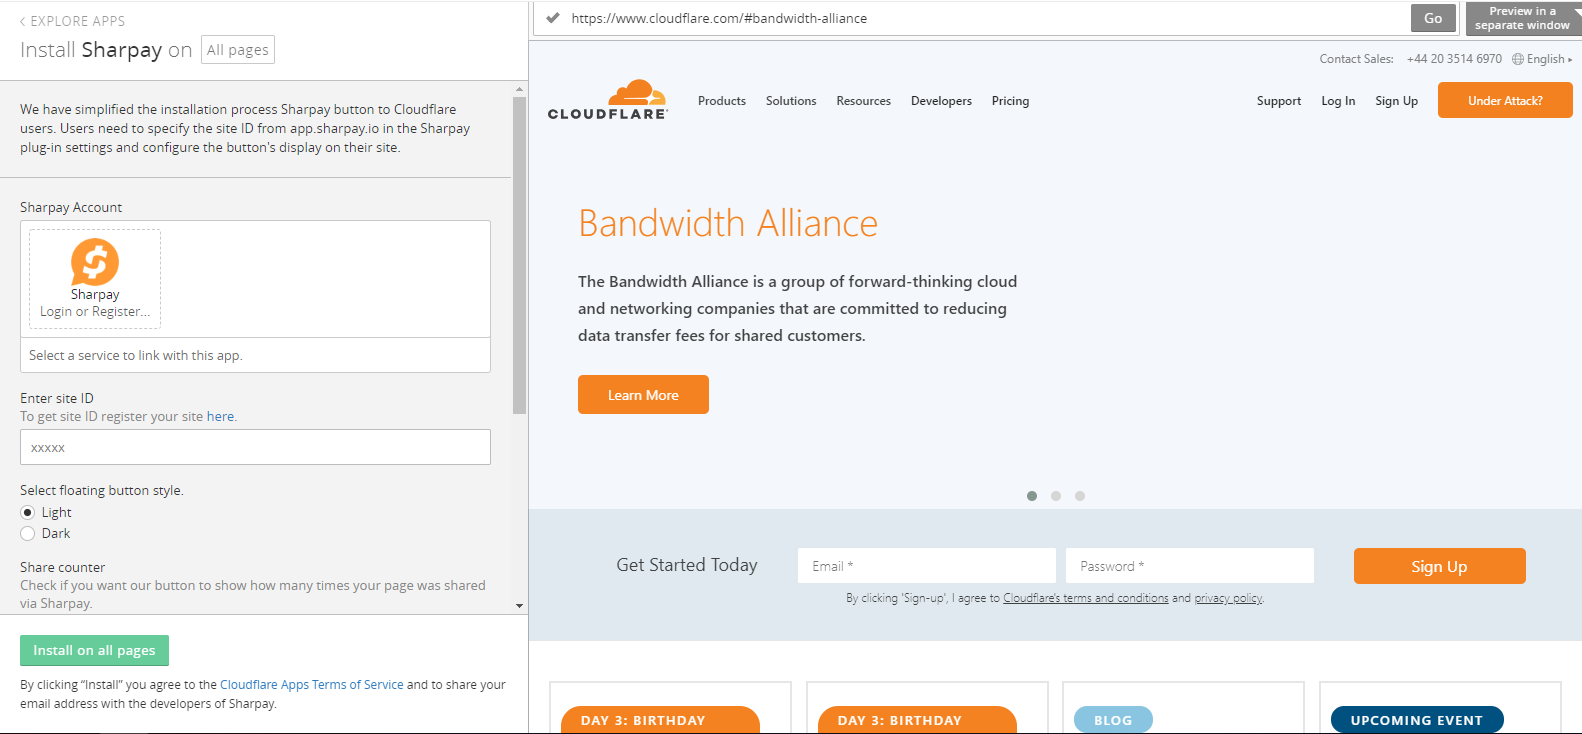
- Finish installing: Click on the "Finish installing on to my site" button and complete the installation.
How to add share buttons to my Telegram public channel
- Search and select @SharpayIoBot on Telegram.
- Click «Start» to begin.
- Choose my language (🇷🇺 / 🇬🇧 / 🇨🇳 / 🇰🇷).
- Click «➕ Channel».
- Send my public channel name or link to the bot. I will get an instruction message to add the bot to my channel. Follow the instructions.
- Go to my Telegram channel and add @SharpayIoBot to my channel admin.
- Congratulations! The share buttons will be attached to every new post on my channel.
Change the name of the share button
In the bot menu, click «💬 Button». Choose the name of the button from the suggested ones or send my version of the name of the share button to the bot.
Emoji buttons
I can add up to 6 emojis for my subscribers to react to my posts.
To customize the emoji buttons, click on the «😀 Reactions» menu. I will see the current look of the buttons and I can send new emojis separated by a space.
Bot Settings
Click on «🛠 Settings» and configure the bot options.
If «Bot active» it will attach Sharpay buttons automatically to all messages I send to the channel.
«Comments» and «Reactions» - control the addition of reaction buttons and comments to the post.
Please note that, it will follow the button settings set by the Admin who added the channel to the bot.
Also in this section I can change the interface language of the bot.
Telegram public channel requirements
I must be the admin of the Telegram channel and that channel must be public when I add it to @SharpayIoBot. If I send a private channel to the bot, it will not work and it will ask me to enter a public channel again.
To change my Telegram channel from private to public, I must be the owner of that channel, I can change my Telegram channel type only on Mobile version or Desktop version (Not on Web version).
Mobile Telegram: Click my channel name and click «Edit». After that, I need to click «link» and I will see «Public» and «Private» options. Choose «Public» and click «Done» to finish.
Desktop Telegram: Click my channel name and click «Manage Channel» in the top menu. Click «Channel Info» and I will see «Public Channel» and «Private Channel» options. Choose «Public Channel» and click «Save» to finish.
After publishing
After publishing a message, I can «Open comments» to write or read comments if I have enabled «✔️ Comments» option. If I want to edit or remove a published message, I can only go to my channel, select the message to edit or remove it.
Manage Channels
I can manage my channels by clicking «⚙️ Channels», and the bot will show me all my connected public channels. I can see «⚙️ Rewards», «✔️» and «🗑 Remove» options.
I can go to «Rewards» and edit my reward methods and the reward size, but in order to do that I need to connect my Telegram account to Sharpay account on app.sharpay.io.
If I check off the «✔️», I will disable the posting function and I will not be able to post any messages to that channel. If I want to disconnect my channel from the bot, I can click «Remove». I can add it back anytime I want by clicking «➕ Channel».
If I have any questions about the bot, I can contact Sharpay @sharpay_admin.
Project Settings
- User’s Rewards (optional setting): I can control my rewarding model
here.
«Reward mode», whether I want to reward users with tokens for Share
and Visits or for Visits only. Visit means click-through, that
is someone visits
the shared links (links shared using Sharpay buttons) and stay there for a
certain time. I can choose in which currency the user will see the reward in the sharing window.
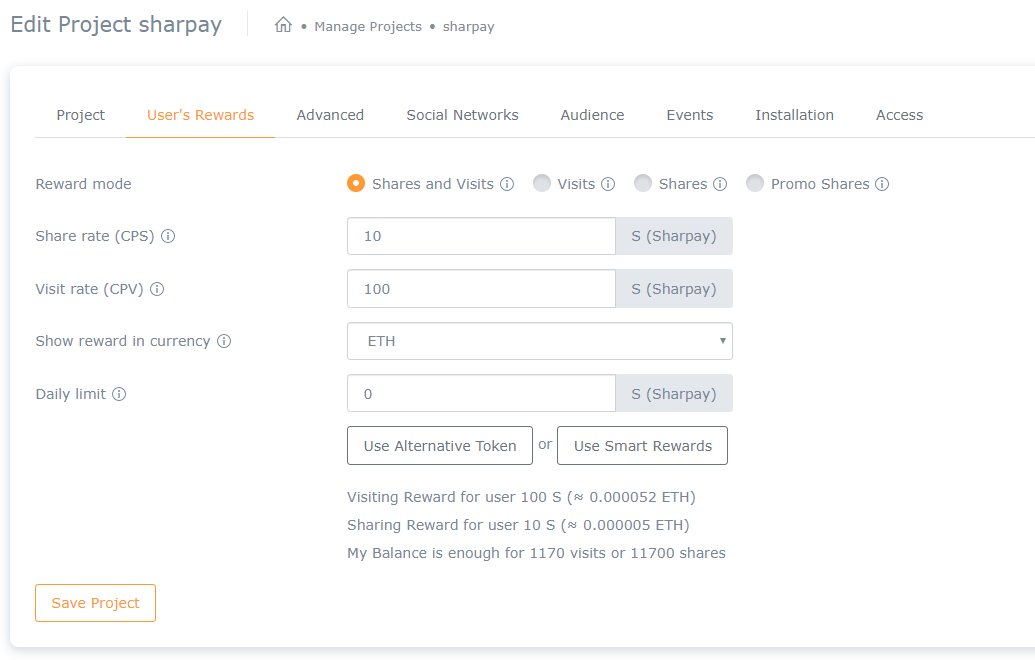
There are 4 types of reward modes:
- Shares and Visite: Reward users for both visiting and sharing.
- Visits: Reward users for visiting on the link they shared only.
- Shares: Reward users for sharing only only after checking the shared links.
- Promo Shares: Reward users only one time for their confirmed share of my website link on their social networks.
"Use Alternative Token": I can use alternative (not Sharpay) tokens to reward users for sharing and visiting.
"Use Smart Rewards": It allows me to reward users with the cryptocurrency which has the highest price daily growth rate based on CMC. The system automatically changes the cryptocurrency to the one that has the highest growth in price in the last 24 hours.
**To be able to edit the reward settings, I need to activate one of the plans.
- Social Networks (optional setting): I can control and target different
social networks.
I only reward those users with tokens for sharing and promoting my websites
on certain
social networks set by me.
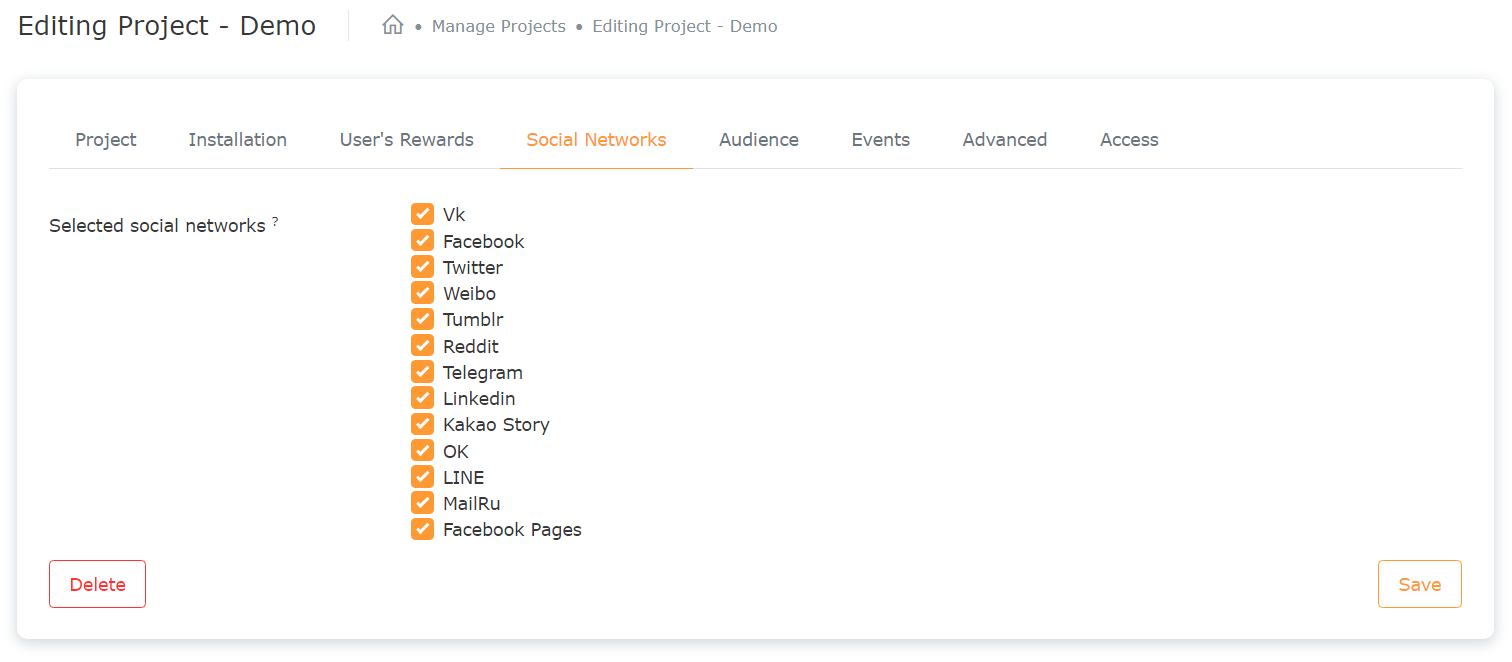
**The default setting is all social networks that Sharpay.io has connected.
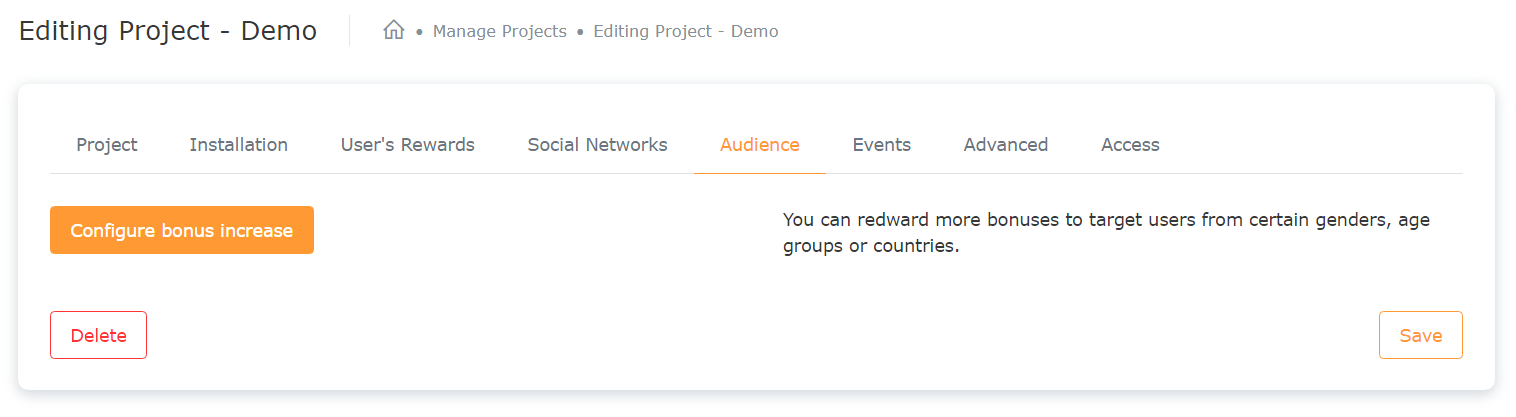
- Audience (optional setting): Set my target audience here.
I can reward target users with more tokens based on gender,
age groups, countries and more.
- Events (optional setting): Conversion events allow me to track the
actions of
site visitors who follow referral links on social networks shared by Sharpay
button users.
I can reward button users with more tokens for visitors' actions, such as
sending
forms, clicking on buttons, completing orders, etc.
- Advanced (optional setting): Here I can control the «Effective period»
(the life time of a
shared link), «Repeat visit» (the time interval between visits so that visit
will be considered
as a new visit), «Duration of visit» (The duration of time that an user should
spend on the site
so that his visit is counted).

"Shorten links via": If my site works with dynamic content that creates by JavaScript, and there are problems when creating my website preview with "utm" tags, shorten my link via Sharpay is suggested. This will give me the correct website preview on different social networks.
**If I am not sure what to do with the «Advanced» setting, I may just leave it as default. My Sharpay button will work fine without it.
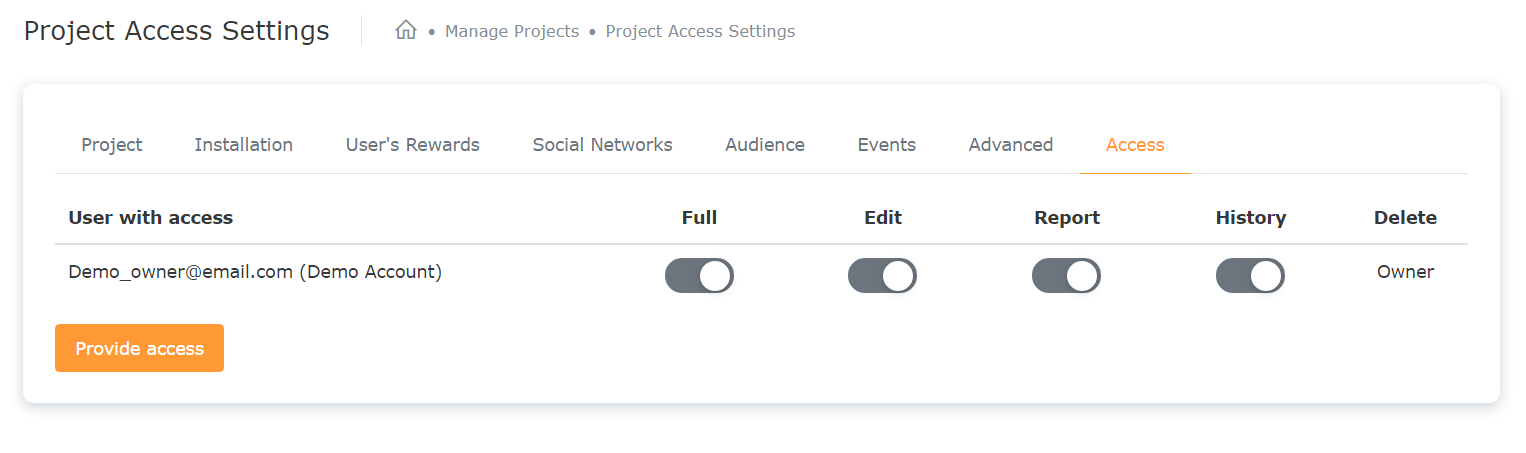
- Access (optional setting): I can delegate project management rights to
my colleagues’
Sharpay accounts. I can change the project management rights of a delegated
person anytime
I want by switching on/off the toggle buttons. I can also remove a person
that I no longer
want him to access and manage my website project.
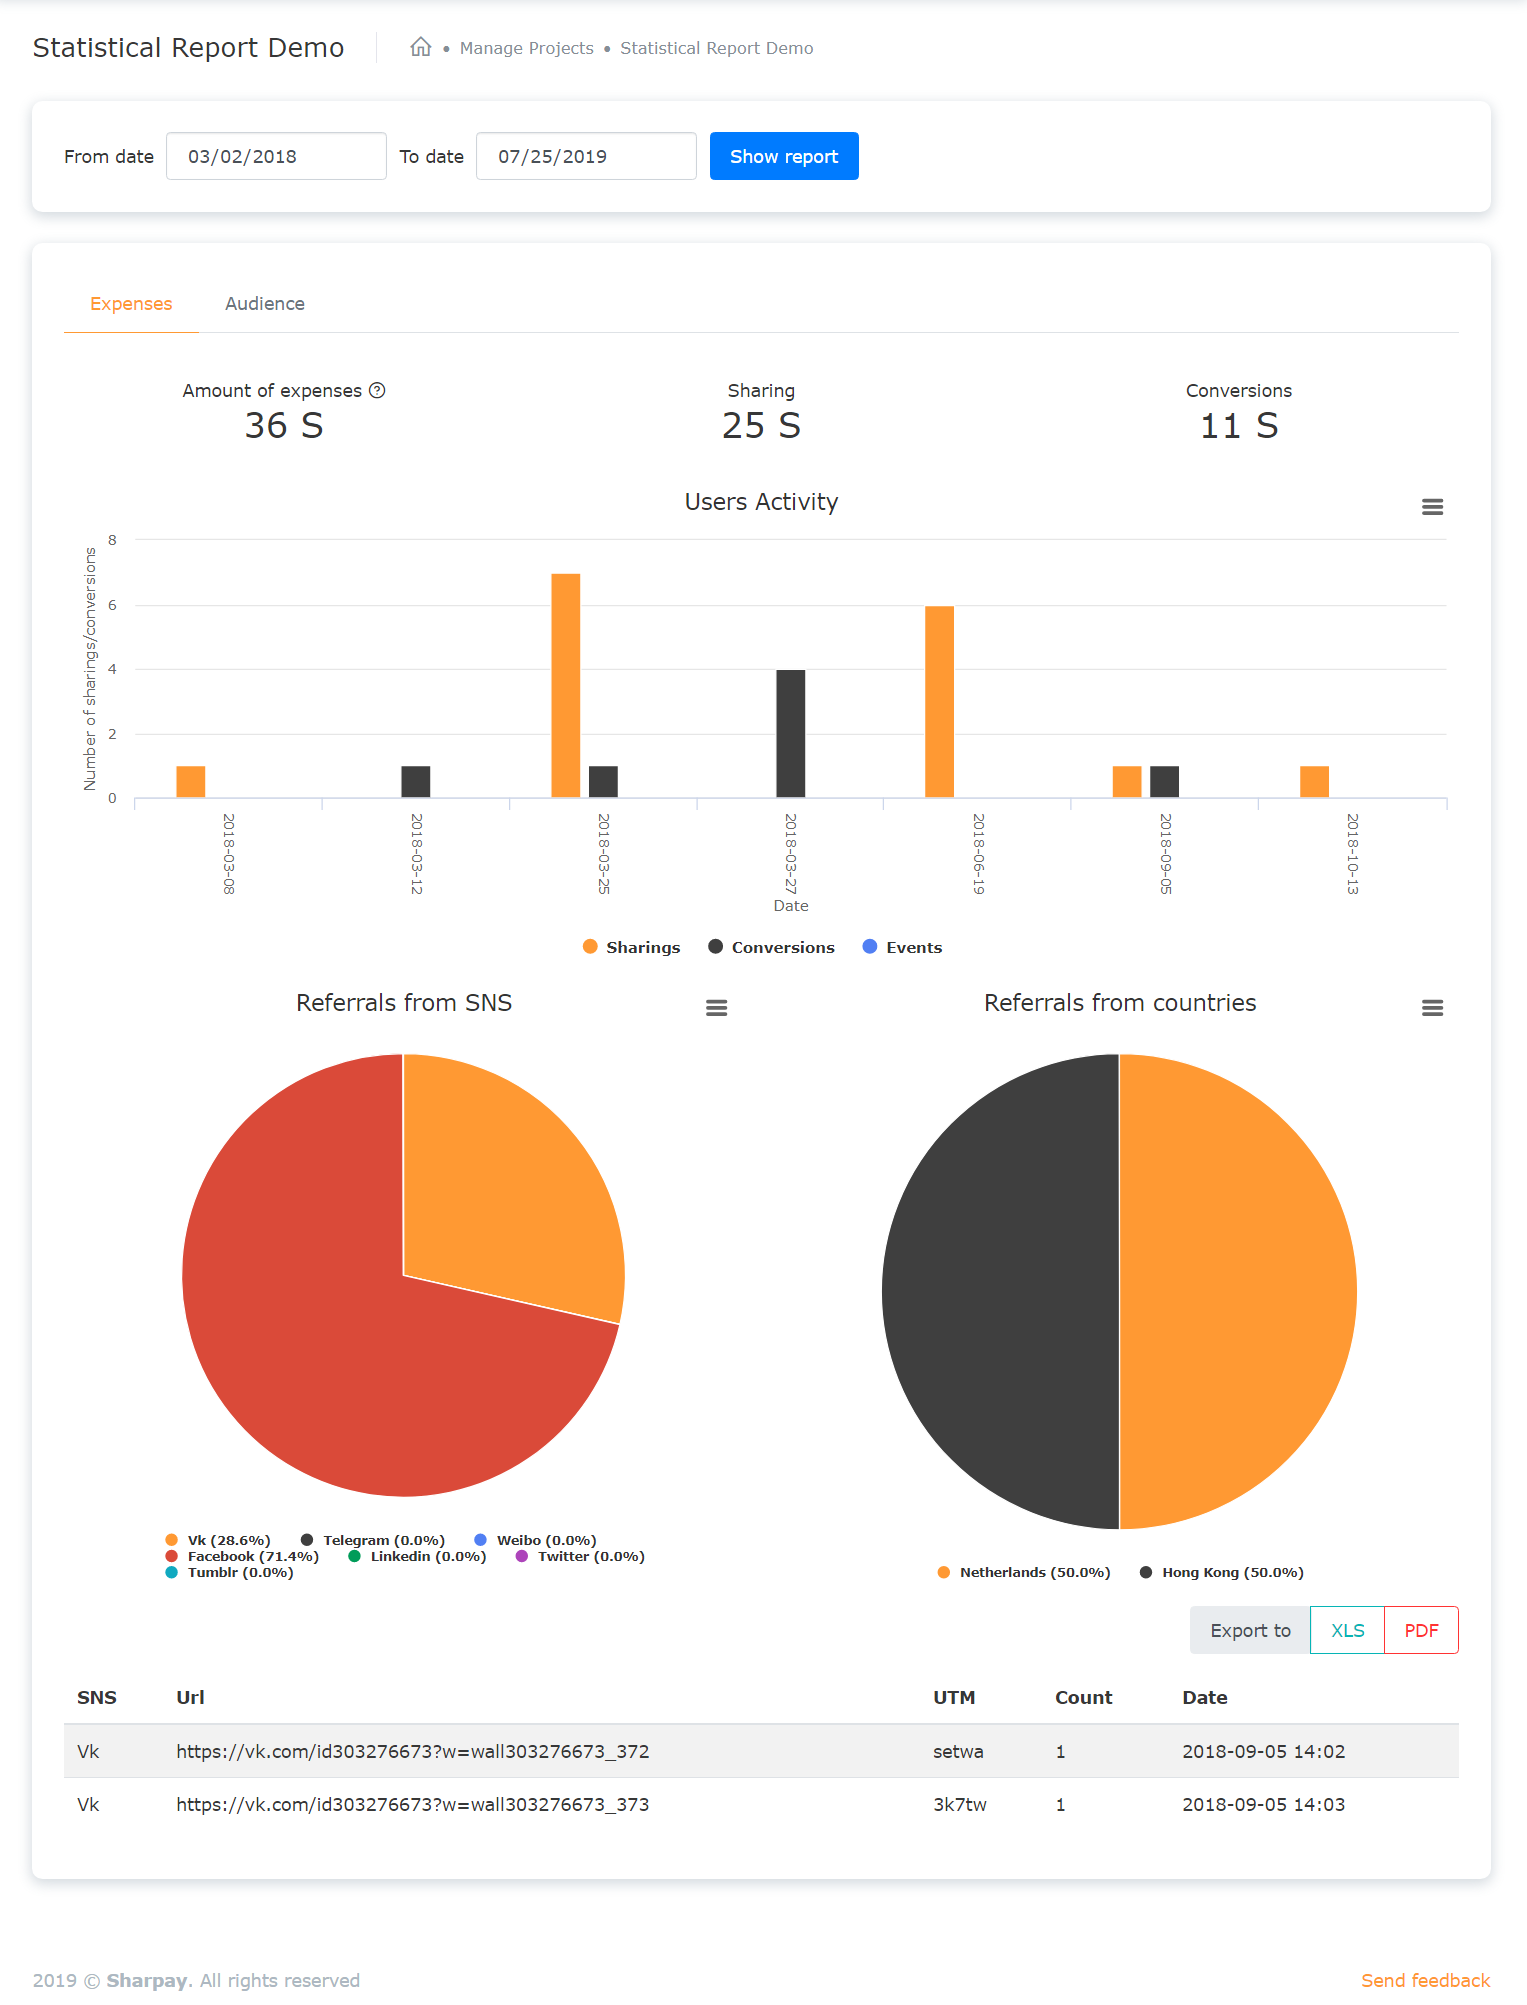
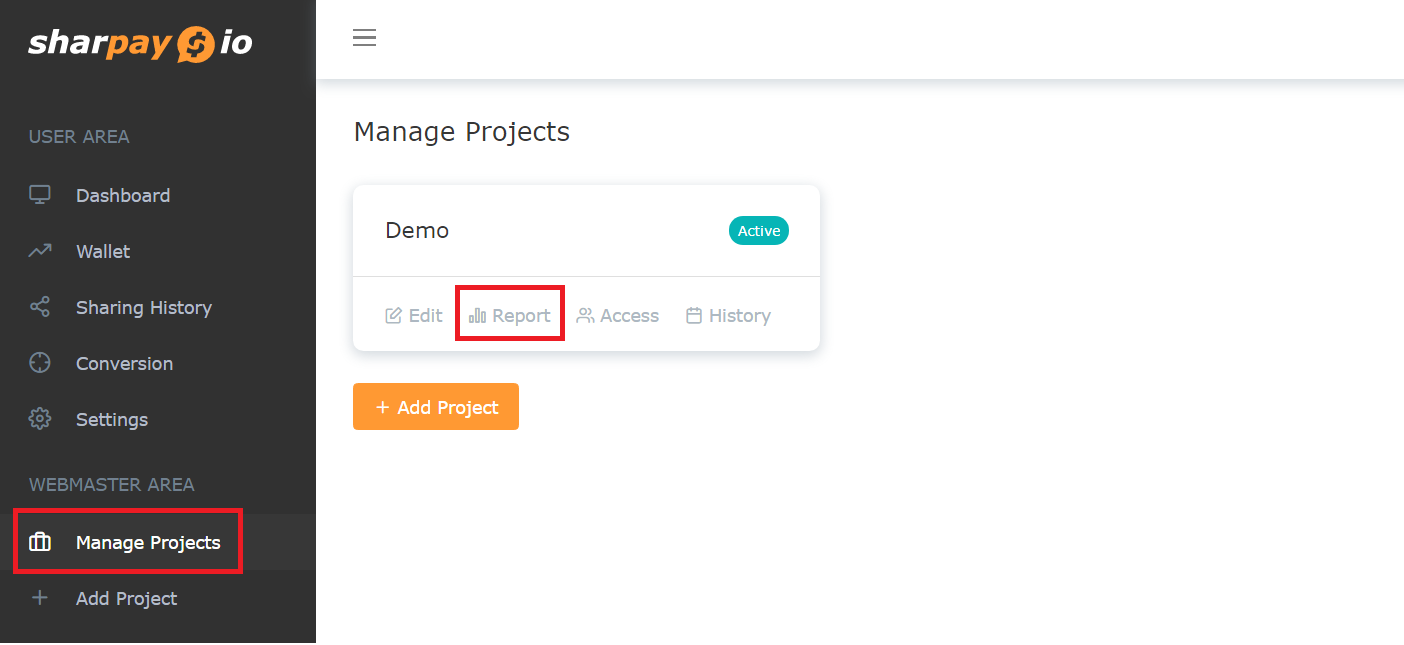
Project Reports
I can generate a detailed report by clicking «Report» and export the reports into Excel file or in PDF file.
Example of a report: